8 Essential Steps to Clawhammer Banjo
Lesson 6: Hammering On
Welcome to the sixth installment in the 8 essential steps to clawhammer banjo course. In this lesson, we’ll be picking up where we left off in our last video by continuing our work on fretting techniques. Hopefully, you’ve made your way through the exercises from the last video and are comfortable with the basics of fretting a note.
As I mentioned in lesson five, the fretting hand in clawhammer banjo is oftentimes called upon to do more than it is on perhaps your average stringed instrument. Specifically, there are many circumstances where, instead of sounding a note with our picking finger, we’ll instead use one of the fingers of our fretting hand to do so.
And in the next two videos, we’ll be covering the two primary techniques for doing so. The one we’ll be covering in this video is the hammer on.
THE HAMMER ON
When we execute a hammer on with our fretting hand, what we’re essentially doing is taking a string that’s already vibrating (and sounding a note we can hear), and then fretting it while it’s still moving. In doing so, we produce a new note.
There are a couple of ways of executing the hammer on. The first is to hammer onto a string that we’ve just struck with our picking hand.
Hammering on the Same String
If you’ve played other stringed instruments, or if you’ve played fingerstyle banjo, then you’re probably familiar with the technique of hammering onto a string you’ve just struck.
For example, if I strike the open 4th string with my picking finger, and then hammer onto the 4th string at the second fret with the middle finger of my fretting hand, I’ve used my fretting finger to change that note from a D to an E.
So go ahead and give that a try on each of the strings. Try playing the open 4th and then, while the string is still sounding that note, fret the string at the 2nd fret with the middle finger of your fretting hand.
Then try doing the same on the 3rd string – play it open and then hammer onto the 2nd fret with your middle finger. Then try playing the open 2nd, and then hammer onto the 1st fret with your index finger. Then play the open first, hammering on again at the 2nd fret with your middle finger.
Practice those hammer ons for a bit until you’ve gotten the basic idea of it.
Hammering onto a Different String (alternate string hammer ons)
One of the cool things you can do with hammer ons, which works particularly well on the banjo, is to strike a note with your picking finger, and then hammer onto a different string with your fretting hand. This is often referred to as an “alternate string hammer on”.
For example, I can strike the open 2nd string with my picking finger and then hammer onto the 3rd string at the second fret. Once again, the string I’m hammering onto with my fretting hand is different than the one I just struck with my picking hand (though the technique is the same).
So now give this try. Try striking the open 2nd string, then hammer onto the 3rd string second fret. Then strike the open 3rd, and then hammer onto the 4th string second fret.
Once you’re comfortable with that, we’ll move on to a couple of exercises.
Exercise One
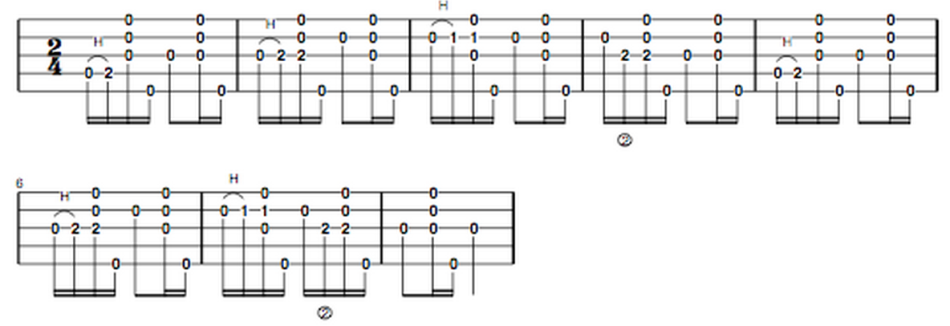
In this first exercise, we’re going to use a little picking pattern to practice these two hammer on techniques.
In tablature, a hammer on onto a string you’ve just struck is typically represented with an arc joining the two notes together, with a capital “H” over the top (standing for “hammer”). An alternate string hammer on, on the other hand, is represented by a number underneath the tablature, which refers to the finger of my fretting hand I usually use to execute the hammer on.
For example, in the fourth measure of the example below there’s a “2” underneath the tab. Here, I’m striking the open 2nd string with my picking finger, and then hammering onto the 3rd string (at the 2nd fret) with my 2nd finger (a.k.a my middle finger; 1=index, 2=middle, 3=ring, 4=pinky).
Exercise Two
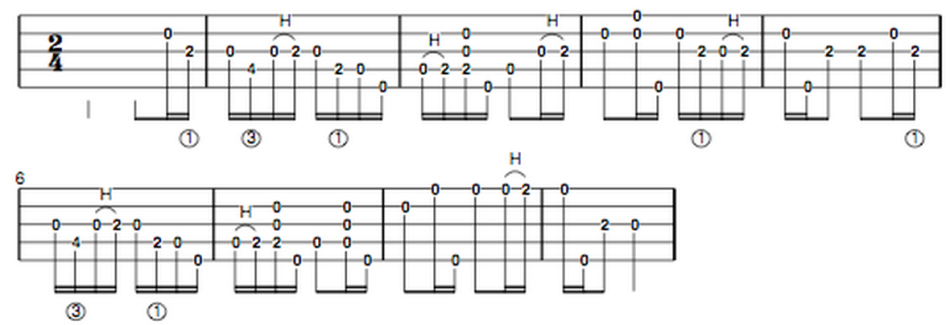
In this last exercise, we’ll be playing the A part of the tune “Turkey in the Straw.” It’s a very “notey” tune, and I’ve chosen it because it’s one of those tunes where the use of hammer ons allows us to play more melody notes than we would be able to if we were just to use the picking finger of our picking hand. So this exercise gives a nice illustration of what this technique allows you to do.
Here’s the tab:
Now, don’t worry if this one feels challenging at first. It’s supposed to. If you’re practicing it along with the metronome (click here for the metronome playlist), I’d suggest starting with perhaps the 40 bpm setting and then slowly working your way up from there. And, most importantly, have fun with it!
As always, if you have questions or comments about this lesson, feel free to leave them in the comments section of the video.
See you in lesson 7!
Go to Episode 7 >>

