8 Essential Steps to Clawhammer Banjo
Lesson 5: Basic Fretting and Picking Patterns
Welcome to the fifth installment in the 8 Essential Steps to Clawhammer Banjo course. Up until this point, we’ve been exclusively working on developing our picking hand, or the clawhammer stroke.
And that’s for good reason, because the clawhammer stroke is what gives this style of music its defining sound.
And if you’ve made your way through the first four videos, then you should have a firm grip on the fundamentals of the clawhammer stroke, which will serve you well from here on down the road in whatever you choose to do with this style.
That being said, I don’t want to give you the impression that the fretting hand is somehow less important in clawhammer banjo. In fact, I’d argue that the fretting hand is called upon to do more in clawhammer banjo than it is with your typical stringed instrument, and that’s largely because of the clawhammer stroke itself.
I’ve said before that one of the most important things to do when you’re playing clawhammer banjo is to make sure you’re always keeping that clawhammer motion going with your picking hand.
But always remaining in that set pattern introduces a constraint. There will be times when you’d like to play a note with your picking hand, but that doing so would require you deviate from the pattern (which we don’t want to do). So, the way you get those notes is oftentimes with the fretting hand.
As a result, the clawhammer banjo player has a toolbox of left hand techniques that are somewhat unique to this style of music. In the next sequence of videos in this series, we’re going to be covering basic fretting, as well as some of these more unique clawhammer banjo fretting hand techniques.
In this installment we’re going to first be covering the basics of fretting. If you’ve played a stringed instrument before, or if you’ve played other styles of banjo, then this will be a bit of review for you. But not to worry – in the next series of videos we’ll be covering some of the more advanced techniques that are more unique to the clawhammer style.
Also, we definitely won’t be neglecting the picking hand altogether. In fact, in this lesson we’ll be revisiting some of the picking patterns that we worked on in the last installment, but this time I’ll be demonstrating how those are used within the context of a tune.
Basic Fretting
So as most of you probably know, the way we play different notes on an individual strings is by pressing down on different frets. By doing so, we change the vibrating length of the string, producing a different frequency, which we hear as different notes. And, the further we go down the fretboard (toward the banjo head), the shorter we make the string, and the higher the note we hear.
And just so that you understand the naming conventions we use for the fret positions: the topmost fret (the first one down from the peghead) is referred to as the first fret, the one below that is the second, and so forth all the way down the fretboard. And if your fretting hand is moving towards the banjo head, then you’re said to be moving “up the neck.”
There are a few things to try to keep in mind as you begin working on fretting.
1) Use a light pressure when you fret. It’s common for beginners to try to press down really hard on the fingerboard, and it’s often a habit they have to unlearn later on. But, as I talked about with the picking hand, the more relaxed your hand and the lighter your pressure, the more nimble your fingers will be, the easier it will be to develop speed, and the less likely you will be to develop any problems with pain when you play. So try to fret with as light a touch as you can to get a good note.
2) Place your fretting finger as perpendicular to the fretboard as possible. The flatter your angle of attack (i.e. the closer your finger is to being parallel to the fretboard), the more likely you are to inadvertently mute one of the adjacent strings with the flesh of your finger, which you don’t want to do.
3) Push down the string as close to the fret as possible. You want your fretting finger pressing down just behind the fret. The further back you go from the fret, the harder you have to push to get a nice clean note. And the goal here is to be able to generate a nice crisp, clean note when we fret.
So if you’re completely new to fretting, first I would just recommend you play around with it a little bit. Work on fretting at different spots on the fingerboard, on different strings, primarily with your index, middle, and ring finger.
You may experience a little bit of discomfort at first until you start to develop calluses on your fingertips, and that’s normal. But keep in mind the three points above and work on trying to generate a nice clean, crisp note when you fret.
When you feel a little bit comfortable with fretting techniques, then go ahead and move to the following exercises.
Tune Exercises
The following exercises will serve both as practice for your basic fretting techniques, and will give you a chance to work on the picking patterns that you worked on in the last lesson within the context of a tune.
The tune we’ll be playing is “Skip to My Lou.” Why “Skip to My Lou?”
Number one, it’s a tune that’s hopefully familiar to most, if not all, of you. Which means you should know how the melody goes. It’s very important that, whenever you set about to learn a new piece of music, you first know how it’s supposed to sound, or how the melody goes, before you try to find the notes on your banjo.
That’s especially true right now while you’re also trying to think about and work on these other technical aspects of playing. You have enough to think about without having to figure out how the tune is supposed to go at the same time.
The other nice thing about “Skip to My Lou” is that it’s a fairly straightforward melody, and it lays out nicely on the banjo in standard G tuning.
Speaking of standard G (gDGBD), make sure your banjo is in that tuning before you go ahead and proceed with these exercises. You should have a D on the first string, a B on the second, a G on the third, a D on the fourth, and a G on the fifth string.
The Basic Melody
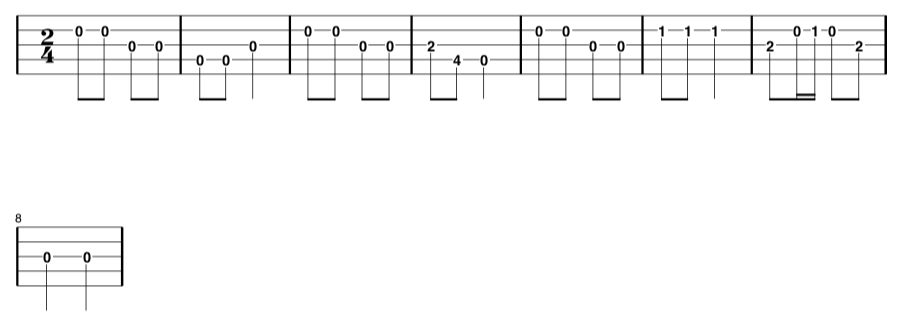
Before we get started with the exercises, I want to make sure that we all have the same basic melody of “Skip to My Lou” in our heads, and we know where those melody notes are on the banjo. Here it s in tablature (without any clawhammery stuff added to it):
I should mention here that when we’re fretting notes, we also want to be efficient with the movement of our picking hand. This means that, whenever possible, we want to keep our fretting hand in one spot, and use different fingers to fret different notes (rather than move our entire hand up and down the neck).
Exercise 1
For the first exercise, we’re going to be playing the same melody from above, but we’re going to be inserting a strum-thumb stroke after the melody notes. This is usually referred to as a “bum ditty” type of pattern (the “bum” referring to the note played by the fretting finger, and the “ditty” referring to the strum-thumb that follows):
Exercise 2
In the second exercise, we’re going to again play the same melody, but we’re going to be playing hammer-thumbs (instead of strum-thumbs) after the melody notes. This pattern makes for a sparser sounding arrangement than the one with the strum-thumbs:
Exercise 3
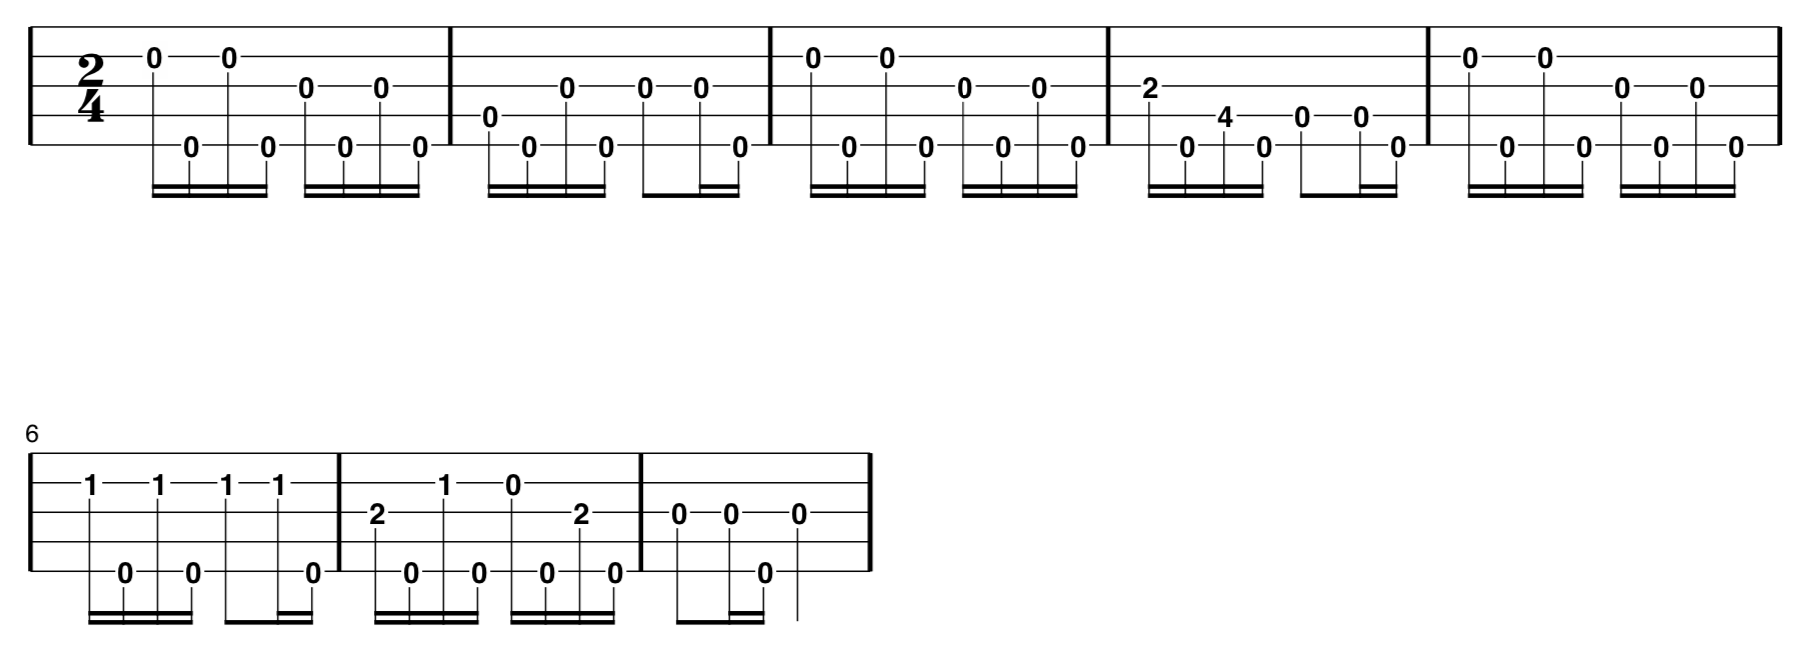
For the third exercise, we’re again going to be playing the same melody, but this time we’re adding a thumb stroke after every downstroke with our picking finger. This gives it somewhat of a stoccato, machine gun, type of sound, and is oftentimes referred to as a “ditty ditty” pattern:
Until We Meet Again
Continue to work on those three exercises, along with basic fretting practice, until the next video. And again I’d recommend, when possible, that you work on these exercises along with the metronome. You can use the metronome playlist on my youtube channel if need be. As always, start out with the slower settings and work your way up to faster ones as you get comfortable with it.
Once you’ve got those under your belt, you’re all set to move on to lesson six!
Go to Episode 6 >>


