Test Your Knowledge
If at any point you want to test your tab-reading skills, just click the button below to take the quiz and test yourself!
The Essential Guide To Reading Clawhammer Banjo Tab
Below is a video and text tutorial (and quiz!) on how to interpret banjo tabs (the banjo-specific system of musical notation), including the conventions I personally use to convey certain techniques.
Though I’m a big proponent of learning to play by ear, and start folks off on this path early on in the Breakthrough Banjo course, I also think tab is an extremely useful tool for communication, and as such a very useful teaching tool.
Additionally, all the tabs on this site are rated according to the “Brainjo Level System” to indicate the technical skills required to play them and their overall level of complexity. For more about the level system, go here.
Reading the Tabs (video description)
Reading the Tabs (text description)
Each line of the tab corresponds to a string of the banjo, starting with the top line, which corresponds to the 1st string. The line on the bottom thus corresponds to the short 5th string. The letters on the left hand side (GDGBD in this case) indicate what note the corresponding string is tuned to.
For illustrative purposes, this is how it looks superimposed on a 5-string banjo:
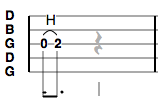
The note to be played is indicated by placing on number on the string, which indicates the fret that should be held down when the note is played. A “0” indicates that the string should be played open (i.e. – unfretted). In the following example, the 3rd string is to be played open, followed by the 1st string at the 2nd fret:
In order to convey certain aspects of the fingering for these tunes, I’ve used a few conventions throughout:
1. Fretting hand notes. Some of the notes in these arrangements are generated by the fingers of the fretting hand – i.e. hammer-ons and pull-off. When these are performed on a string that’s just been struck by the picking hand, then the technique is indicated by either the letter “H” for hammer-on, or “P” for pull-off.
If a hammer on or pull off is to be performed on a string other than the one that’s just been struck (i.e. and “alternate string” hammer-on or pull-off), then this is indicated by a number underneath the tablature. The number refers to the finger of my fretting hand I generally use to execute the technique (1=index, 2=middle, 3=ring, 4=pinky).
Generally speaking, if the string is lower in pitch than the one that’s just been struck, then you’ll be sounding it with a hammer-on. If it’s higher in pitch, you’ll sound it with a pull-off.
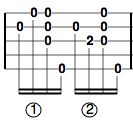
In the following example, the first “1” underneath the tablature indicates that the corresponding note – the open 1st string – is to be generated using a pull-off with the 1st finger of the fretting hand. The “2” underneath the tablature in the example below indicates that the corresponding note – the 3rd string at the 2nd fret – is to be played using a hammer on with the 2rd finger of the fretting hand.
To learn more about these techniques, they’re explained in detail in the related videos that are part of the “Clawhammer Banjo in 8 Essential Steps” series, which you can access below:
Hammer-On Video
Pull-Off Video
2. Slides. Slides are denoted as a line with the abbreviation “Sl” next to it that adjoins the starting fret to the ending fret. In the example below, a slide is to be played by starting at the 3rd string, 2nd fret and sliding to the 3rd string, 4th fret:
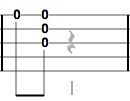
 3. Strums. I usually indicate strums, or brushes, across multiple strings as three simultaneous notes. In the example below, the 1st string is played open, followed by a strum across strings 1-3:
Even though three specific strings are indicated here, you are free to choose which particular strings you strike when executing the strum. There’s a great deal of individual differences in this technique – some players like the sound of strums across all 4 strings – some prefer a sparser sound of only a light strum across two strings. So when a strum is called for, please choose what sounds best to you.
4. Skip Notes. Notes that are inside of a shaded box (or a parentheses) are “skip” notes, meaning they’re not actually sounded by the picking finger.
In these instances, the hand continues with the clawhammer motion, but the nail doesn’t actually come in contact with the string. Should you elect not to “skip” that particular note, then the suggested note to play is the one inside of the shaded box. In the example below, there are two skip notes; should you decide not to skip them, then you’d strike the 2nd string at the 1st fret instead in both instances:
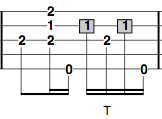 Skip notes are very useful for adding syncopation to a tune, oftentimes in combination with an ensuing drop thumb (as well as for vocal backup to provide a bit sparser sound).
For more on skip notes, and “syncopated skips” in particular, I have a detailed video on the subject, (part of the Breakthrough Banjo course), which includes a detailed explanation of these, along with several picking exercises to help you master the technique:
Syncopated Skips Video
5. Drop Thumbs. Any time the thumb strikes a string besides the 5th, it is indicated by a “T” underneath the note in the tab.
6. The “Galax lick.” The Galax lick, which some folks refer to as a “roll,” involves striking two or more strings in succession with the picking finger, which is then typically followed by a thumb on the 5th string (see the video in the playlist below for a demonstration, which includes slow motion).
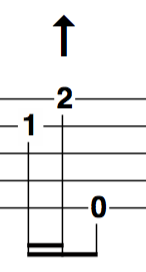
In the tabs here, the Galax lick is indicated by an “up” arrow above the note that’s to be struck by the picking finger (note that this is a note that falls on the offbeat, and this is the one circumstance where the picking finger plays a note on the offbeat, which is typically the domain of the thumb or fretting hand).
In general, you can “roll” across anywhere from 2 to 4 strings when executing the Galax lick, and what you choose is a matter of personal preference. Regardless of which you elect to perform, they must all occupy the same amount of time. I’ve included video demonstrations of the Galax lick across 2, 3, and 4 strings (see the videos in the playlist below that demonstrates each of these).
Think You’ve Got It? Then TAKE THE QUIZ
The best way to ensure that you understand how to read tab is to take the short quiz. Click on the button below to start.
Video Demonstrations of the Techniques
Below is a library of videos demonstrating each of the techniques covered in the above discussion. I’ve included 3 videos on the Galax lick to show it being done on 2, 3, and 4 strings (and in slo-mo!):
Take the QUIZ!
The best way to ensure that you understand how to read tab is to take the short quiz. Click on the button below to start.


