8 Essential Steps to Clawhammer Banjo
Lesson 7: Pluck Off
Welcome to the seventh installment in the 8 essential steps to clawhammer banjo video series. In this lesson, we’ll be continuing to work on those fretting hand techniques that allow us to steal extran notes from the banjo without breaking the clawhammer motion. Last time it was the hammer on, this time…the pull off.
THE PULL OFF
The pull off is one of those techniques where it can be easy for folks to get into a bad habit, usually because they’ve gotten the wrong idea about what they should be doing with their fretting hand/finger to execute the technique.
I think this could’ve been largely avoided if we could just go back and rename this a “pluck off”, because in my mind that’s the best way to think about it. What you’re really doing here is plucking the string with your fretting finger – instead of your picking finger – to play a note.
So, before you go any further, go ahead and just try plucking the first string with the index finger of your fretting hand. Try to do it so you get a clear note that rings out. Then try that same thing using your middle and ring finger.
Plucking Off on the Same String
Now, just as we did with the hammer on, the first thing we’re going to learn is pulling off on a string we’ve just struck with our picking finger.
For example, if I fret the first string at the second fret with my middle finger, then strike that string with my fretting hand, and then pull off the string after I’ve struck it, what I’ve done here is used my fretting hand to change the note from an E to a D.
So now go ahead and practice pulling – or plucking – off the 1st string at the 2nd fret with your middle finger after you strike it with your picking finger. \
Then try the same thing at the 1st fret of the 2nd string using your index for the pull off.
Then try a pull off on the 3rd string, 2nd fret with your middle finger.
And lastly, try pulling off the 4th string, 2nd fret with your middle finger. Do this until you feel like you’ve got the basic idea of it, then move on.
Pulling Off onto a Different String (alternate string pull offs)
Just as was the case with the hammer on, one of the cool things we can do with this technique is pull off a string other than the one we’ve just struck with our picking finger.
The technique here is the same as pulling off the same string in that we’re just plucking a string with a fretting finger – the only difference being we’re doing this on a string other than the one we just struck with our picking finger. And what this allows us to do is play another note without having to break the clawhammer motion.
One more important thing to note here is that it actually doesn’t matter where on the fretboard you pluck off the string. Regardless of whether you pull off up towards the peghead or way down by the banjo head, the note you play will be the same.
So go ahead and give that a try. Strike the second string open with your picking finger, then pull off the first string with your index after doing so. Give this pull off a try with your middle and ring finger as well.
You may ultimately find one finger feels more comfortable for these pull offs, and might become your “go to” finger for this technique in the future.
Exercise One
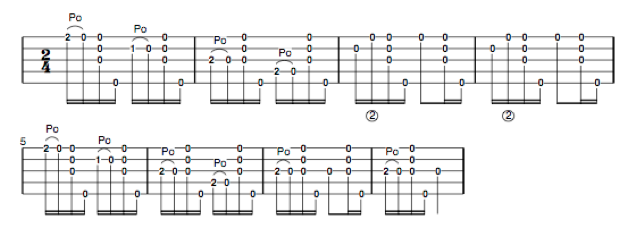
In this first exercise, we’re going to use a little picking pattern to work on these two pull off techniques. You’ll note here in the tab that, similar to the hammer on, a pull off is represented by an arc joining the string you strike with your picking finger to the note you pull off to with your fretting finger, with the letters “PO” over it to signify a pull off.
Alternate string pull offs are denoted by a number underneath the tab, which refers to the fretting hand finger I typically use to execute the pull off. So you’ll see there’s a “2” underneath the tab in measures 3 and 4, indicating that I’m pulling of the first string in each of those spots using my 2nd, or middle, finger.
The tuning for this exercise is standard G (gDGBD).

Once again, I’d encourage you to practice these exercises along with the metronome, and you can use the metronome playlist I’ve created if needed. Start out at the slowest setting and only move to faster speeds once you can comfortably play along with the one you’re on.
And though the exercise itself is just eight measures long, I’d encourage you to keep looping through it over and over as you practice it (I’d encourage doing this with all of the exercises).
Exercise Two
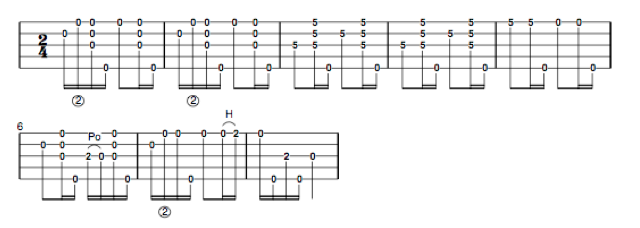
So in last week’s second exercise, we played the A part of the tune “Turkey in the Straw”. Naturally, I thought it fitting we conclude this video with the B part, which, as it turns out, also provides a good workout for our pull offs.
Just like the hammer ons did for the A part, the pull offs here allow us to get melody notes in this tune that we wouldn’t have otherwise been able to get without breaking our clawhammer motion. Once again, you may find this a little challenging right now, and that’s perfectly fine. Just use it as motivation to push yourself to get better.

You’ll note in this tab in measures 3 and 4 that there are spots where the number “5” is on strings 1, 2, and 3. Here, you’re executing a brush stroke, and you do so while laying your index finger of your fretting hand across the strings at the fifth fret (so that you’re simultaneously fretting all 3 strings and the 5th fret). This is referred to as a “bar” position for the fretting hand (the finger is functioning as a “bar” over the strings).
JUST PLUCK IT
Okay, if my mathematical skills serve me right, we have only one lesson left in our 8 essential steps video series. And if you’ve made it to this point, congratulations, cause you’re developing all the fundamentals you need for a lifetime of great music, and your hard work and focus will ultimately pay off in a big way.
So, until next time, go pluck off!
Go to Episode 8 >>