8 Essential Steps to Clawhammer Banjo
Lesson 3: Striking Single Strings
Welcome to the third installment in the eight essential steps to clawhammer banjo video series. To recap where we’ve come from so far, in the first lesson I discussed with you the two primary motions of the picking hand, which are the up and down hammer motion and the side to side strum.
In the next lesson, I introduced you to the concept of the thumb rest, which is that at the conclusion of either of those motions, the thumb should come to rest pressed up against the fifth string.
Hopefully you’ve practiced the exercises from both of those videos, and are all set to proceed with this lesson. As always, if you have any questions or comments regarding the materials as you work through them, please feel free to leave that in the comments section of the video, and I’ll be happy to answer any questions you have.
3 GOALS
So in today’s lesson, we’re going to work on striking the individual strings with our picking finger. And we have three main goals to accomplish when learning this particular skill. We want to be able to:
1) Pick each string cleanly
2) Pick each string without looking at our hand.
3) Modulate the amount of force we use when we strike the string, which will allow us to vary the volume of our playing.
Now, as you begin to work on the skill of striking single strings with your picking finger, you’re undoubtedly going to be inaccurate at first. You’ll miss the strings, you’ll hit the wrong one, you’ll hit multiple when you’re trying to hit one. This happens to everybody when they first get started.
In fact, it’s a bizarre idea to begin with to think that we’d be able to cleanly strike the single strings of the banjo just by moving our hand up and down. But, such a thing is indeed possible just with a little bit of dedicated practice.
FRUSTRATION-FREE FRAILING
So don’t get frustrated. Remember that most of the changes that occur in the brain to support any new skill are going to happen when you’re sleeping anyhow, based on what you’ve done the day prior. So, the real goal of a practice session is not to improve right then and there, but rather to give your brain the signal that you’d like it to change, and to tell it the way in which you’d like it to change – i.e. the skill that you want it to learn.
So, if you put in a little bit of focused effort day in and day out, each day you’ll wake up a little bit better, and I think you’ll probably surprise yourself at how quickly you’re able to learn something that at first may seem impossible.
To begin with, just try striking each individual string by itself – the first string, second string, third string, and fourth string – with your picking finger. Almost certainly, you’re going to find that striking the first string is the easiest, simply because it only has one string next to it. And as you work on striking each individual string, there are a couple of things that I’d like for you to keep in mind.
1) Start out with a very light touch, and then gradually increase the amount of force you give to the string. As I said in an earlier video, you’ll probably be surprised at just how little effort it takes to get a sound out of the string. If you’re able to develop a light touch from the beginning it’s going to make your life a lot easier down the road, particularly as you try to develop speed, and it also will allow you to vary the volume in the playing of any given tune.
2) As you get a little comfortable with this technique, start experimenting some with not looking at your picking finger when you play. Remember, ultimately we want to be able to strike the strings with our picking hand without having to look at it at all. It may seem somewhat counterintuitive, but you’ll actually be able to develop accuracy more easily and more quickly if you don’t look at your hand than you will if you do. You don’t have to do this right away; however, over time as you get a little comfortable with it, start playing out around with not looking at your hand as you’re trying to strike the individual strings, until you ultimately reach the point where you no longer have to at all.
It turns out that your brain is actually quite good at monitoring the position of your body, including the position of your hands, without any visual feedback whatsoever.
And, in fact, these “body to brain” feedback loops operate a lot faster than the vision to brain loops do, which means they’re a lot better suited to playing a musical instrument. It’s no coincidence that some of the best musicians we’ve ever known have lost their sight, and have had no choice but to use these better suited “body to brain” networks to develop their playing.
The other thing that not looking helps with is in getting you in the habit of using your ears as your primary means of feedback, as opposed to your eyes. We’re playing music, so we really want to judge how we’re doing by what we hear, and not by what we see. And so starting to do this early on is a great habit to get into.
So go ahead and practice a bit trying to strike each of the individual strings with your picking hand using the hammer motion. And don’t forget about the thumb rest – make sure that the flesh of the thumb ends up pressed against the fifth string at the end of the stroke. Practice doing this for a bit, and once you feel a little bit comfortable with it, we’ll move to a few more exercises with the metronome.
EXERCISE ONE
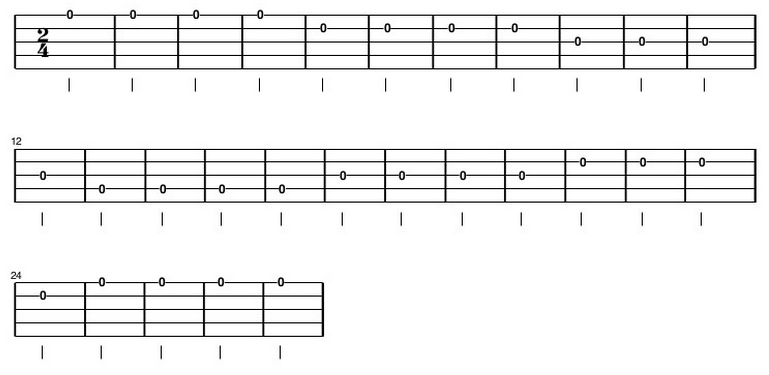
In this exercise we’ll strike each string four times, starting with the first string, progressing up towards the fourth string, and then back down towards the first string. And I once again recommend playing this along with the metronome. As you may remember, I’ve set up a metronome playlist you can use on youtube if you don’t have your own.
For these exercises, start with the lower metronome setting of 80 BPM, and then as you get comfortable playing along with that continue to move up by 10 BPMs until you can play comfortably at around the 100 or 110 BPM setting. I don’t think you need to be able to play these any faster than that to get to where you need to be at this point.
Here’s the first exercise in tablature. Once again, play one stroke for every two clicks of the metronome:
EXERCISE TWO
For the second exercise, we’re going to strike each individual string one time, starting with the first, and then moving back up to the fourth, and then back down to the first:
EXERCISE THREE
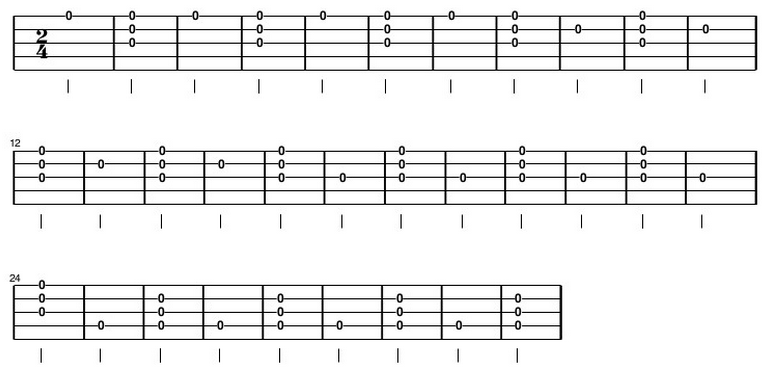
For the third exercise, we’re going to follow a pattern similar to exercise one, but instead after each hammer we’re going to throw in a strum:
EXERCISE FOUR
For the last exercise, we’ll use a pattern similar to the second exercise, but once again insert a strum after every hammer:
So that should be enough to keep you busy until the next installment. As I said earlier, this is will feel awkward at first. But if you stay the course, put in about twenty to thirty minutes a day of focused practice time, bit by bit you’ll undoubtedly get better each day. And in doing so you’ll be forming some great habits that, rather than limiting what you can do, will ultimately allow you to reach your fullest musical potential.
And once you’ve made your way through the exercises, you’re all set to move on lesson 4, where we’ll finally start putting the fifth string into action!
Go to Episode 4 >>


